Objectives
- This tutorial is one part of a containers series of tutorials that will walk the reader through installation of tools that can run applications in containers.
- By the end of these tutorials the reader will be able to
- Install services (container engines) that can run containers using tools such as LXD/LXC, Docker, or Podman.
- Launch simple applications packaged in containers from template container images. With some of these virtualization and container engines such as LXD/LXC, you can also run lightweight Linux operating systems (e.g. Ubuntu, CentOS) as containers or lightweight virtual machines.
Prerequisites
- A working Linux, Windows or MacOS operating system.
- The LXD/LXC section of these tutorials will be done in an Ubuntu Linux virtual machine installed on a MacOS using Multipass.
- For the rest of these tutorials, the examples will be run on a MacOS operating system, but the reader can refer to the respective software documentation to see how to install and run the relevant steps on other platforms such as Linux or Windows.
Introduction
Virtualization technology has enabled powerful infrastructure architectures that allow single physical hardware systems to host multiple simulated environments. In essence, it allows the sharing of physical resources from a single pool to multiple isolated environments. With virtualization technology and hypervisors that manage the pool of resources, virtual machines can be created that functions as an isolated computer system with CPU, memory, storage and network components leveraged from the physical host.
This pooling of physical hardware resources to generate multiple virtual machines means the physical resources can be efficiently harnessed to power many processes and enable multiple end users to share the same physical system. This has led to the explosion of cloud infrastructures and platforms.
Even so, though virtual machines are more lightweight than their physical counterparts, containers take this concept one step further. In the diagram below we can see that applications in each isolated virtual machine requires a guest OS to be installed and configured on top of a hypervisor before the applications can be run and executed. Containers are another virtualization technology that enables applications to be run in its own isolated environment with its own packages and configurations. A container engine manages the pool of resources that are distributed to containers. Containers can be created and destroyed on the fly and are less resource-intensive compared to virtual machines.
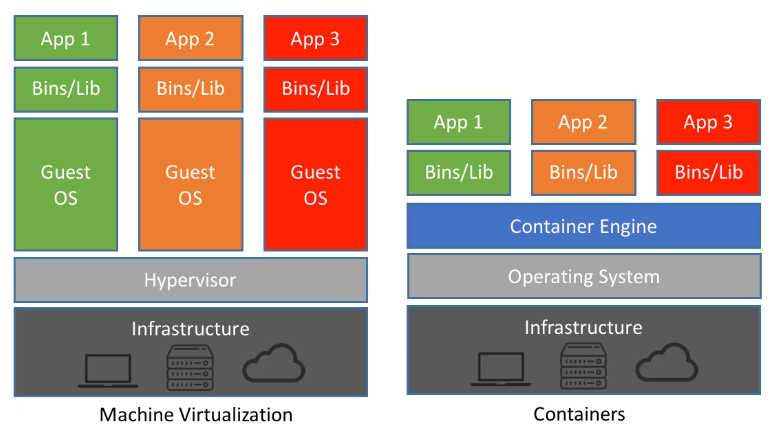
Virtual machines and containers. Image source: netapp.
With containers, a developer can package everything required to run an application in a container image, share the container image and other users can execute this application with the exact same settings in another system as long as the user has a container engine.
In this series of container tutorials we will use some practical commands to get up and running quickly with container technologies to see how convenient containers on Linux are for getting isolated environments for applications. We will explore some container tools such as LXD/LXC, Docker and Podman to get a feel for some of these flavors of container technologies. The reader is encouraged to extend these tutorials and explore further.
LXD/LXC
- First install the container and virtual machine manager LXD.
- On Ubuntu Linux, update the system package manager library cache by executing
sudo apt update - Download and install the software packaging and deployment system snap if not already installed
sudo apt install -y snap
- Use snap to download and install lxd with
sudo snap install lxd
- Initialize the lxd configurations with
sudo lxd init.- Default settings should be fine for initial explorations of the tool.
- For more in depth configurations read the documentations available here and here.
- For example, accepting the default settings will start lxd configurations with some of these components:
- No LXD clustering.
- A new storage pool.
- ZFS storage pool backend.
- A new local network bridge called lxdbr0.
- On Ubuntu Linux, update the system package manager library cache by executing
- With lxd installed, you can now run containers with the lxc command.
- To look at the initial list of available images to pull from and run containers, use the
lxc image listcommand.- For example, to see available Ubuntu images, run
lxc image list ubuntu: - This will generate a long list, so you’ll probably want to either use
grepto filter the list or use a pager such asless - So pipe that command to
greporlesslxc image list ubuntu: | grep -i -E 'aarch64.*container'- This will retrieve all Ubuntu images that are arm64 architecture as well as container-based images (as opposed to virtual machine specs which are also available)
lxc image list ubuntu: | less- This will send the retrieved list to the pager less
- For example, to see available Ubuntu images, run
- To find information regarding an image before running it, execute the
lxc image infocommand.- For example, to find out more about the CentOS 9-Stream image run
lxc image info images:centos/9-Stream -
- Note that in
images:centos/9-Streamabove,imagesis the server (default for lxc), and after the colon,centosis the Linux distribution, and9-Streamis the release. The distribution and release are case sensitive soimages:Centos/9-Streamandimages:centos/9-streamwon’t work. - For more available images on the lxc default server take a look here.
- For example, to find out more about the CentOS 9-Stream image run
- And to launch and run the CentOS 9-Stream execute the command
lxc launch images:centos/9-Stream -
- Now list the available containers on your machine with
lxc list -
- To look at the initial list of available images to pull from and run containers, use the
- Enter your container with
lxc exec centos9 /bin/bash.- Replace
centos9with whichever name you gave your container. /bin/bashis the login shell, but you can also use another shell such asshso the command would change tolxc exec centos9 /bin/sh- Once in, you can run CentOS 9-Stream linux commands such as
cat /etc/os-releaseorhostnamectlfor example. - You can also update and install packages using CentOS’s package manager yum as you would in a CentOS virtual machine.
- CentOS 9-Stream also comes with pre-installed software and packages such as the Python programming language, Linux utilities sed, awk and curl.
- For example try some of these commands in the CentOS 9-Stream
python --versionsed --versionawk --versioncurl -I --http2 <https://www.keycdn.com>


- For example try some of these commands in the CentOS 9-Stream
-


Summary
In this tutorial, we introduced the concept of containers and how to complete some simple tasks involving the installation of the container suite of tools LXD/LXC as well as launching a working CentOS 9-Stream Linux OS container. With a few commands, you were able to have a lightweight Linux distribution containing familiar Linux utilities and tools such as yum, and curl.
In subsequent tutorials we will also explore alternative container engines and tools such as Docker and Podman.
